Getting started
Choose your printer
First of all, choose a cartesian 3D printer, which you would like to visualize in our simulation.
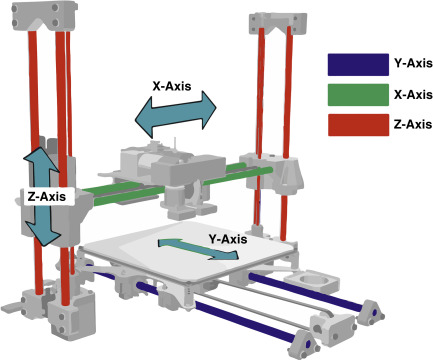
These printers are the most common type of desktop printer. They work by having three axes of motion for the print-head that are at right angles to each other: X, Y and the vertical Z. The nozzle can move in any direction along one of these three axes within the bounds of the box.
In order to complete the simulation with your printer you need the Meshes and the URDF model. You can place the component this way into any where.
Choose a model to print
There is a default model which is loaded into the simulation at the beginning but there is the opportunity to change it to another one. All you need is the G-code of your model, then you can browse it from your computer.
Control
The 3D printer can be controlled using the display panel on the right side of the printer. Press the display with the red crosshair to interact with it. The mouse is now captured in the context of the display, allowing you to press interact with it. Now the BROWSE button can be clicked on, this brings up a file explorer window. In this window, browse the .gcode file to be printed. Watch the demo video for a visual guide.
Click here to learn more about .gcode files.
Once the file has been loaded, press the START button to begin the printing process.
To exit the display context, press the red button containing an X at the top centre of the MaxWhere window.
To pause the print press the STOP button. This only pauses the process, the print stays on the bed, while the printer head stays at the last given coordinate. The print can be unpaused by clicking on the START button.
To reset a print press the RESET button. Warning, this way the print is completely stopped. Althought the print stays on the printing bed, the printing head moves back to the start position. If the START button is pressed, the print will be removed, and a new print will start.